This page is the most modern appraisal of the propagation methods being used today, by the presenter Ian Donaldson.
Many people now follow his methods with great sucess throughout all of the Begonia Societies, He also gives excellent lectures which are far more detailed on this subject. These presentations are given to members of Scottish and National Societies, during which he creates enormous interest in this most important of subjects.

REPRODUCTION/PROPAGATION
A Double Flowering Begonia like any living organism on this planet has two distinctly different and separate phases or periods during its life (survival followed by reproduction) prior to death and in order to understand the second or reproductive phase I will cover both how the plant reproduces and also propagation by use of plant material. This article will hopefully answer most of the commonly asked questions in relation to this subject e.g.
1. How does a Double Flowering Begonia reproduce.
2. Can we influence/control how a Double Flowering Begonia reproduces.
3. What parts of a Double Flowering Begonia can we use for propagation purposes and is time a factor in this process.
4. Is an eye required for propagation.
5. Why do my cuttings fail.
Before answering any of these questions it is important that we understand that it is only once a Begonia is satisfied that it can survive (completed the first phase - production of a tuber), that it will turn its attention to reproduction (production of flower leading to seed). In addition it should be noted that a plant or for that matter plant material will always take the most direct route (least time consuming) to achieve the second phase as time is always a factor due to its short growing season. If for some reason it is prevented from taking the shortest route it does have various other options available to achieve this goal and if time allows it is capable of taking extreme measures to reproduce.
The answer to question No.1 in simplistic terms and without human intervention is the production of flower followed by seed. The only drawback to this method of reproduction for the grower is that each of the plants obtained from the seed will be genetically different to that of the parent plant.
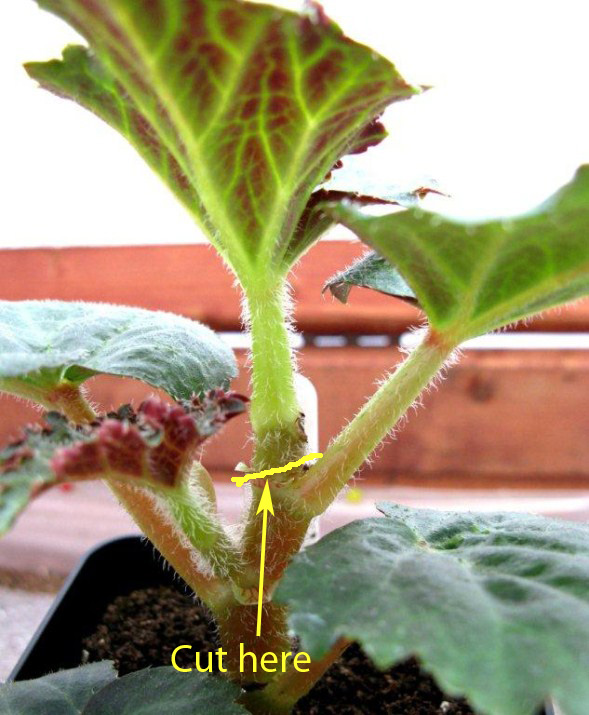
Just to complicate things slightly and to answer in part question No 2, if we use an early rooted cutting as a “control plant” and by purely removing the growing point above the third or fourth leaf we have then prevented the plant from flowering on the main stem (its quickest option for reproduction) forcing it to produce side shoots in order to produce flower.
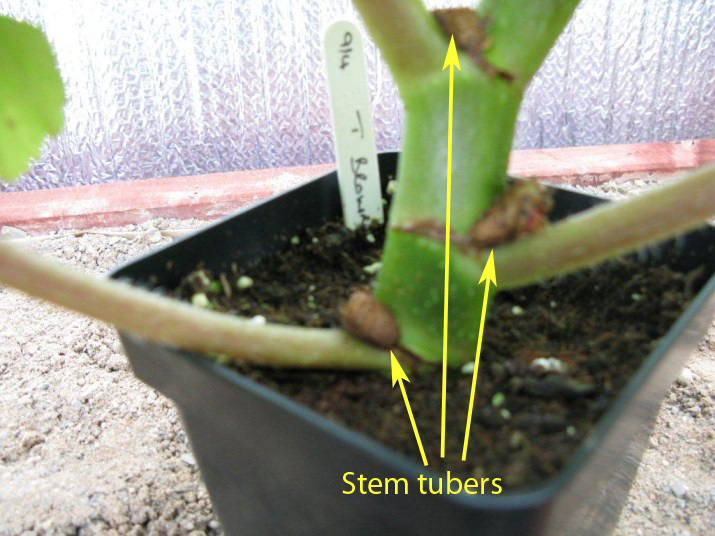
Stem Tubers can clearly be seen
If we in turn remove all subsequent side and basal shoots as they appear we will again have prevented the plant from producing flower and subsequent seed thereby causing the plant to find an alternative way of reproducing. If this process is continued into the later part of the growing season (September) the plant will realise that time is against it, abort its attempts to produce flower and channel all of its energy into producing viable tubers genetically identical to itself at one or more of its leaf axils above soil level.
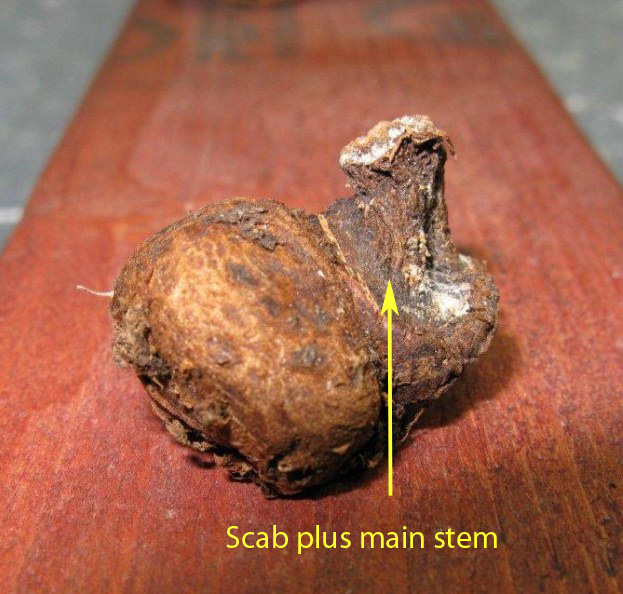
If you wish to try this method and are successful then I would suggest that the best way to harvest these tubers is to leave them on the stem and when the stem falls off the parent tuber either in segments or as a whole at the end of the growing season store them in this condition during the dormant period only removing them from the then withered stem about one week before starting them up the following year.
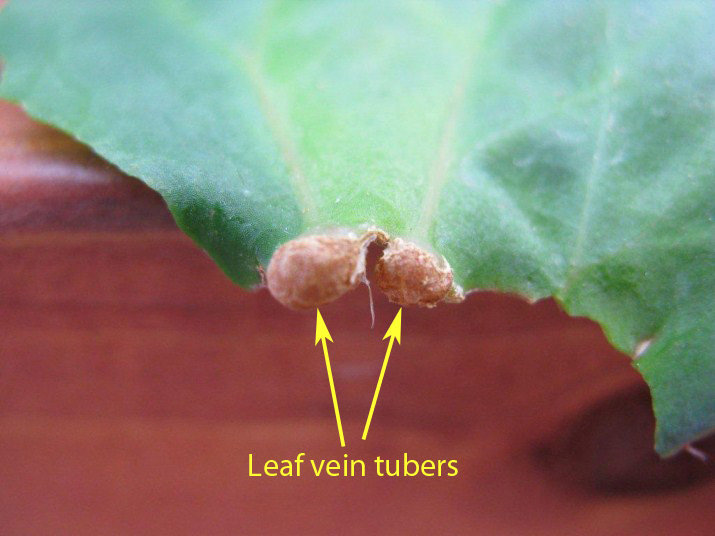
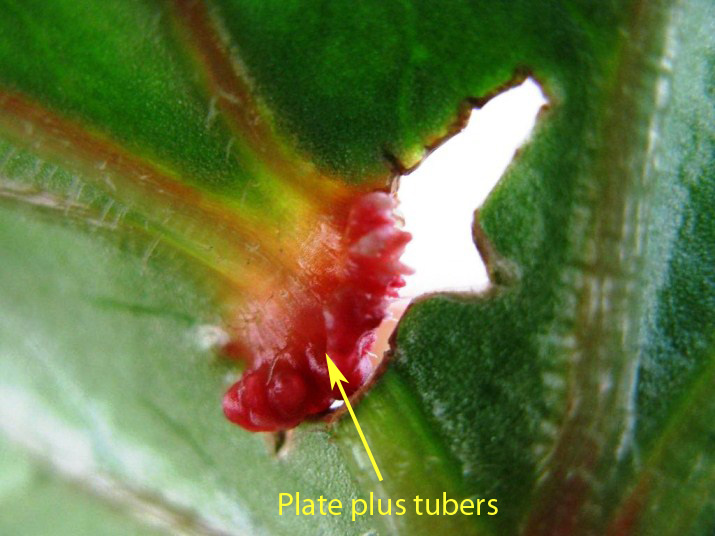
In addition to causing the plant to produce stem tubers and to complete the answer to question No.2 in full, we can also cause the plant to produce leaf vein tubers/plants. This is achieved by removing all but one of the basal shoots from the tuber, thereafter removing the growing point of the plant above the first or second leaf and then cut through one or more of the larger veins on each leaf surface. Thereafter the process of removing side and basal shoots as described above is carried out in order to prevent the plant from producing flower/seed. The plant will then channel all of its energy into forming either a single tuber or a plate with multiple tubers on the section of cut leaf vein furthest from the leaf stem and if time allows, a single plant in the case of a tuber or a number of plants in the case of a plate will emerge. No compost is required around the cut vein as the parent plant (while the leaf is still in good condition) is still capable of providing the required nutrients,
Up until now we have covered how the plant itself is able to reproduce and how it will adapt to overcome human intervention to achieve its goal. In order to answer question No.3 we will now cover how we, the amateur grower, can propagate Double Flowering Begonia’s by the use of available plant material.
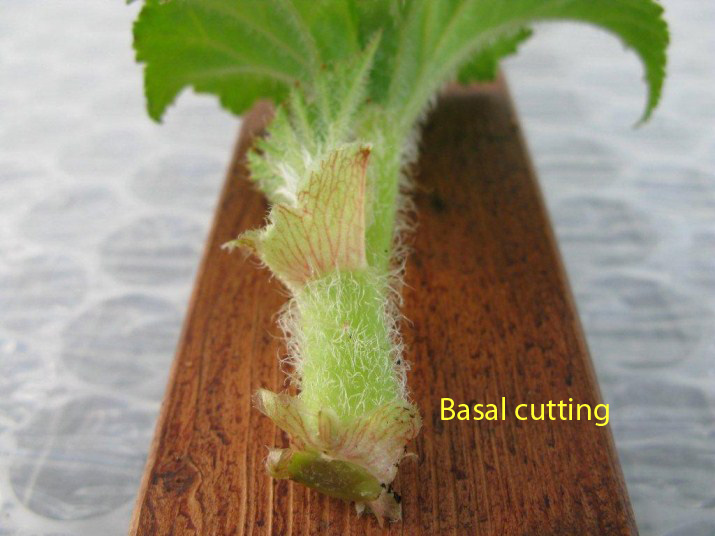
The two most common methods in use today are known as basal and stem cuttings.
Basal cuttings are normally shoots surplus to the grower’s requirements that emerge from the tuber either during the starting up period or later in the growing season. These can be removed when they have attained approximately 10 cm in height by gently rocking them back and forward until they break off at their base or by use of a scalpel blade cutting them off below the bottom eye.
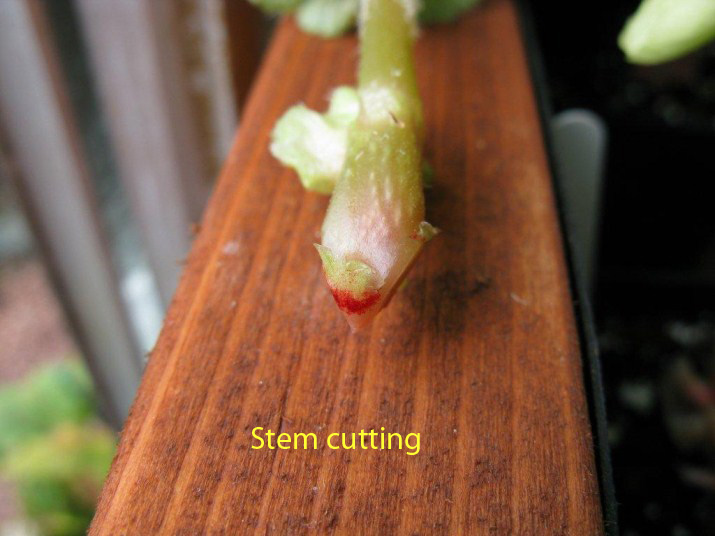
Stem cuttings, as they are commonly referred to, are actually side shoots and are not available until the plant is in a more mature state of growth. The recognised method of removing them from the main stem is with a scalpel running the blade down the side of the main stem to a point just below the eye located at the base of the side shoot. A second cut is made by running the blade along the top of the leaf stem towards the main stem until it meets the first cut beneath the eye on the side shoot. In effect you have removed the side shoot by cutting a “V” shape at its base immediately beneath the eye.
The only draw back that I have experienced using this method of removal is that damage can be caused to the main stem or leaf stem by cutting too deeply into either stem which will result in cracking in that area at a later date. In order to alleviate this potential problem I would suggest that an alternative method is used. Rather than start the cut at the top of the stem, you create the same “V” shape beneath the eye at the base of the side shoot by simply inserting the blade into the side shoot to a depth of approximately one third of its width and by placing your thumb so that it covers the cut and push the side shoot away from you. This method will still secure the removal of the side shoot with the eye but will have the added advantage that the wound will be far less likely to crack at a later date.
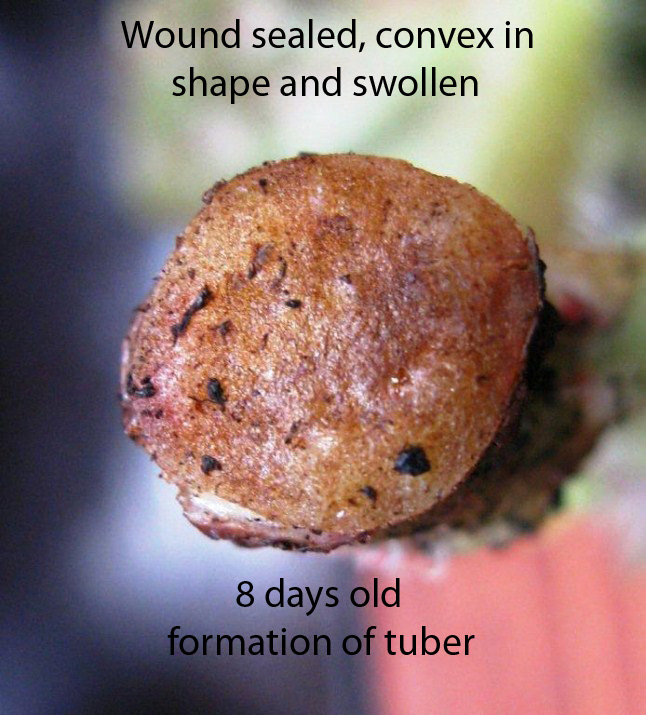
The advantage of taking the above types of cuttings is that each piece of plant material used has very little work to do before you have a growing plant that is genetically identical to that of the parent plant. If you were to study the plant material during its first 8 to10 days you would observe that the area surrounding the wound will seal, begin to swell and become convex in shape; this is the initial formation of the tuber (completion of the survival phase) and only when this has been achieved will it start to produce the root system required for the continued growth of the plant as it moves from the survival phase into the reproductive phase of its life.
Finally and possibly the two least common methods of propagation are by leaf cuttings and main stem sections.
The success to producing a plant or a number of plants from a leaf cutting is to ensure that the material chosen is both young and healthy. The older the material chosen the less likely there is of success. By use of a scalpel the leaf stem with leaf is removed from the parent plant close to the main stem and the lower 12 mm of the stem is inserted into the growing medium.
If required a plant label can be inserted into the growing medium beneath the leaf surface in order to ensure its stability. If the leaf is able to locate a viable eye on its stem then it will produce a tuber at its base and from that eye it will grow its main stem, this being the least time consuming process (approximately 14 days). If however no viable eye is detected on the leaf stem then a plate will be formed at its base and tubers will form around the outer edge of the plate. From these tubers young plants will grow which in turn will produce their own independent root systems. The latter process is very time consuming and will take approximately 2 months to complete.
Once these young plants are about 10 cm in height then provided sufficient time is available during the growing season I would suggest that these be divided and grown on separately treating them as you would standard cuttings. By doing this you will achieve the best results.
Main stem sections are not dissimilar to basal or stem cuttings in that the plant material will always have an eye and therefore will only require the production of a tuber before concentrating on the reproductive phase of its life. If we start at the top of the main stem and cut through it immediately below the first true leaf, this will provide us with a section of plant material containing a main stem, a leaf, and a growing point.
Before dissecting the main stem further, wait approximately 7 days and you will find that the remaining section of main stem above the next leaf will naturally ‘sugar’ and fall off and at this time we are then ready to remove the next section of main stem. This is achieved by again cutting through the main stem beneath the top leaf. This will provide us with an almost identical piece of plant material, the only difference being that the growing point is in fact a dormant eye concealed between the leaf stem and the main stem. This procedure can be repeated throughout the length of the main stem.
If you wish, by leaving the lower leaf and main stem section beneath it intact, a side shoot will grow from this point and the whole process can be repeated using the newly formed side shoot as the donor.
Once you are satisfied that you are competent with this procedure you can then experiment and cause the plant material to behave in an identical manner to that of a leaf cutting without an eye.
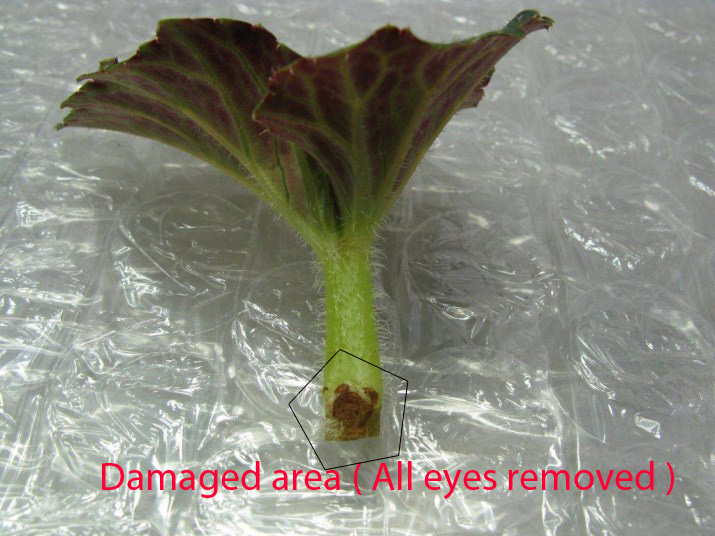
This is achieved by damaging the embryonic eye(s) located where the leaf stem meets the main stem forcing the plant material to produce a plate and subsequent tubers/plants. The only draw back to this method of propagation is the availability of time. The standard procedure will give you a single plant in approximately 14 days whereas the latter procedure will give you a number of young plants in approximately 2 months.
I am sure by now that it has become obvious that time is a factor when dealing with the reproductive/propagation phase, and that you will have noted that the more you require or cause the plant or plant material to do, then the longer it will take to achieve the required result.
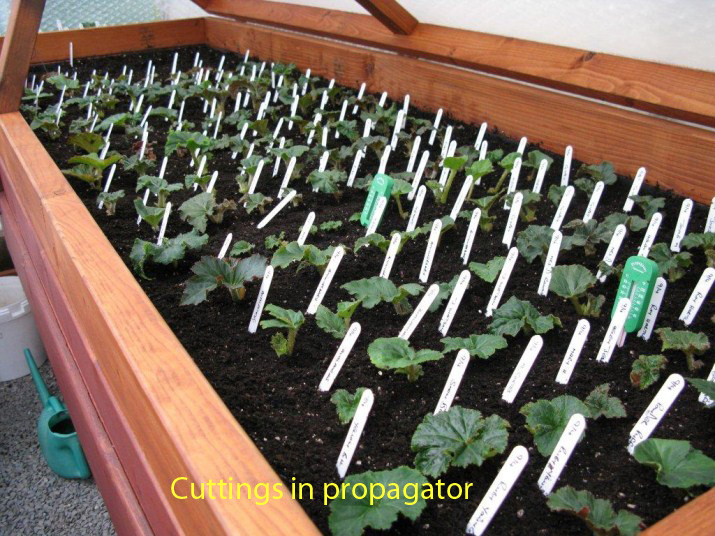
Up until now I have not covered the growing medium or for that matter the environment in which I grow the above pieces of plant material. My own experience over the short period that I have been growing begonias is that the best medium to use is a good quality seed compost with added perlite kept damp but not wet. This is placed in a home made propagator with a bottom heat of between 20 - 23 degrees centigrade.
Notwithstanding the above, successful propagation can be achieved without bottom heat during the warmer months of the year or without compost by simply placing the plant material in water.
In answer to question 4 - is an eye required for propagation? My own opinion is that an eye is not required and that it would appear that if no eye is available to a piece of plant material then it is capable of producing an eye or eyes provided that a vein/artery has been cut. From this a tuber, tubers or plate will be formed resulting in either a single plant or a number of plants being produced.
Lastly and in answer to question 5 – Why do my cuttings fail.
Most of us have at some stage or another been told that when taking cuttings you should put them in the compost and leave well alone. Only when you can see that they are growing do you consider doing anything with them. The problem with this statement is that all the work carried out by the cutting during the first six to ten days is carried out beneath the compost level and should anything go wrong then you are unaware of it until it is too late to rectify the situation.
During the first six to eight days of the cuttings life it will concentrate all of its energy into sealing the wound and starting to produce a tuber. Only when this has been achieved will it consider producing root as root is only required to sustain and develop top growth.
Evidence of this can be observed if you were to take a cutting in November when daylight hours are shortened and night time temperatures are low and to keep the cutting only frost free.
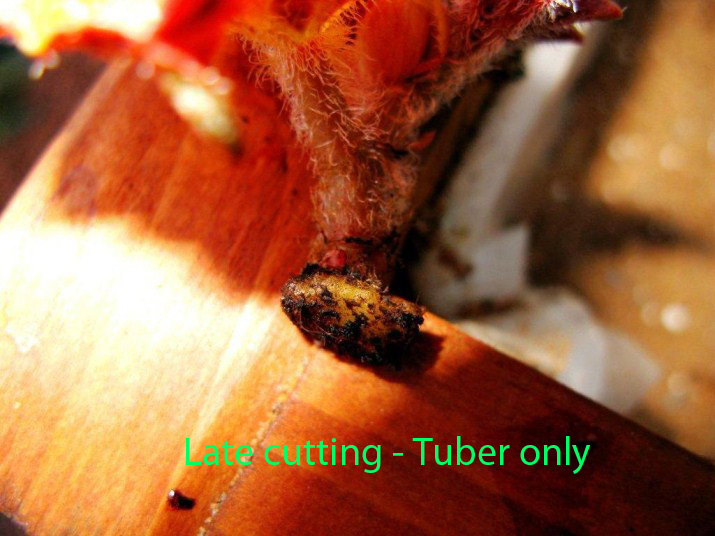
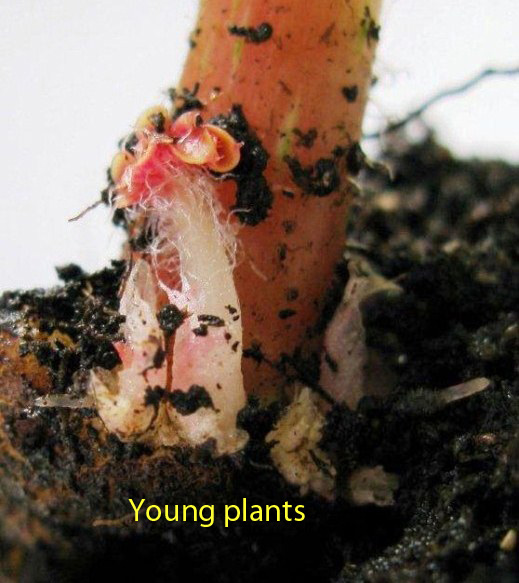
The cutting will produce a tuber but will not produce root until the ambient temperature is increased to such a level as to convince the cutting that it has time to reproduce. Other examples can be seen in the above photographs titled “Leaf Vein Tuber”, “Plate Plus Tubers” and “Young Plants”, all of the above clearly show the survival phase (production of a tuber) and in the case of the photograph titled “Young Plants” tubers, top growth plus root (moving from the survival phase into the reproductive phase).
Failed cuttings will fall into one of two categories or a combination of both:
• Damage caused to the cutting material during removal from the parent plant
• Incorrect growing conditions
If a cutting is going to fail then the likelihood of this happening will occur within the first six to ten days.
If we first look at bullet point No1, it is important that the cutting material is properly harvested without any damage or bruising being caused to the cutting during its removal from the parent plant. The most common cause of damage or bruising is the use of a blunt instrument while removing the cutting or removing the cutting by rocking it backwards and forwards in a manner that has caused damage to the stem.
Bullet point No2 - incorrect growing conditions covers both the growing medium and also the ambient temperature. Cuttings do not require nutrients and therefore seed compost is more than adequate for this purpose. The compost should be open, free draining and moist but not wet. The ideal ambient temperature is one around 20 - 23 degrees centigrade.
In addition to the above if the parent plant has been heavily fed leading up to the removal of cutting material then the likely hood will be that the material is very soft and therefore susceptible to rot. If material such as this has to be used then I would suggest that a peat and sand mixture with no additives be used.
The quicker the survival phase can be achieved then the greater the chances of successful propagation. Do not be afraid to remove the cutting from the compost during its survival phase as no damage will be caused to the material and it is during this phase that the grower will gain greater knowledge of this process.
COMMON FAILURES:
The stem of the cutting has rotted at the base - Damage caused when removing the cutting from the parent plant or, the
compost at the base of the plant is too wet.
The cutting will not produce root - The ambient temperature is too low or,
the compost is sour.
Ian Donaldson
13. 2 .2012